
AWS Codepipeline을 사용하여 CI/CD 환경 구성하기(beanstalk)
AWS CodePipeline을 써보자
회사에서 AWS Codecommit을 통해 코드관리를 하고 있다.
처음 환경을 구성하게 되었을 때, 별다른 코드관리 체계가 없어 어디에 구성을 할까 고민했다.
운영계가 AWS(Beanstalk)를 사용할 예정이니 같은 AWS에서 하면 관리하기 편하지 않을까 생각했다.
Private Repository이구 5유저까지는 무료이므로 비용이 발생하는 건 없다.
다만 CodeBuild의 경우 현재 기준으로 빌드타임 월별 100분 이상시에는 유료로 비용이 발생할 수 있다.
자세한 사항은 AWS 요금을 참고 바란다.
AWS Beanstalk는 패키징된 결과물을 직접 업로드 형태로 배포해도 되지만 조금 더 나이스한 방법으로 하고 싶어서 AWS Codepipeline으로 CI/CD를 구성해봤다.
(나이스하게 구성한건지는 모르겠다 ㅠㅜ)
참고사항이다.
springboot, nuxt(vue)를 통해 개발을 하였다. 프론트와 백엔드 코드가 분리되어 있고, 프론트는 npm, 백엔드는 maven으로 빌드/패키징한다.
- 프론트 빌드 결과물은 nuxt generate를 통해 백엔드의 resources/public 영역으로 복사되어 패키징한다. 운영계는 elastic beanstalk를 사용하고 있다.
빌드/배포 이벤트는 ‘master’ branch의 변경이 감지되면 실행되며 흐름은 아래와 같다.
- 로컬 소스 테스트 완료 후 ‘develop’ branch remote로 푸시
- AWS CodeCommit Console에 접속하여 코드 확인 후 ‘master’ branch에 풀 요청 생성 및 병합
- 빌드 이벤트 시작(Codebuild)
- 빌드 성공 후 Deploy (Elastic Beanstalk로 배포)
아래 설정 내용들을 참조한다. 처음에 조금 삽질을 했지만 한번 해보면 크게 어렵지 않다.
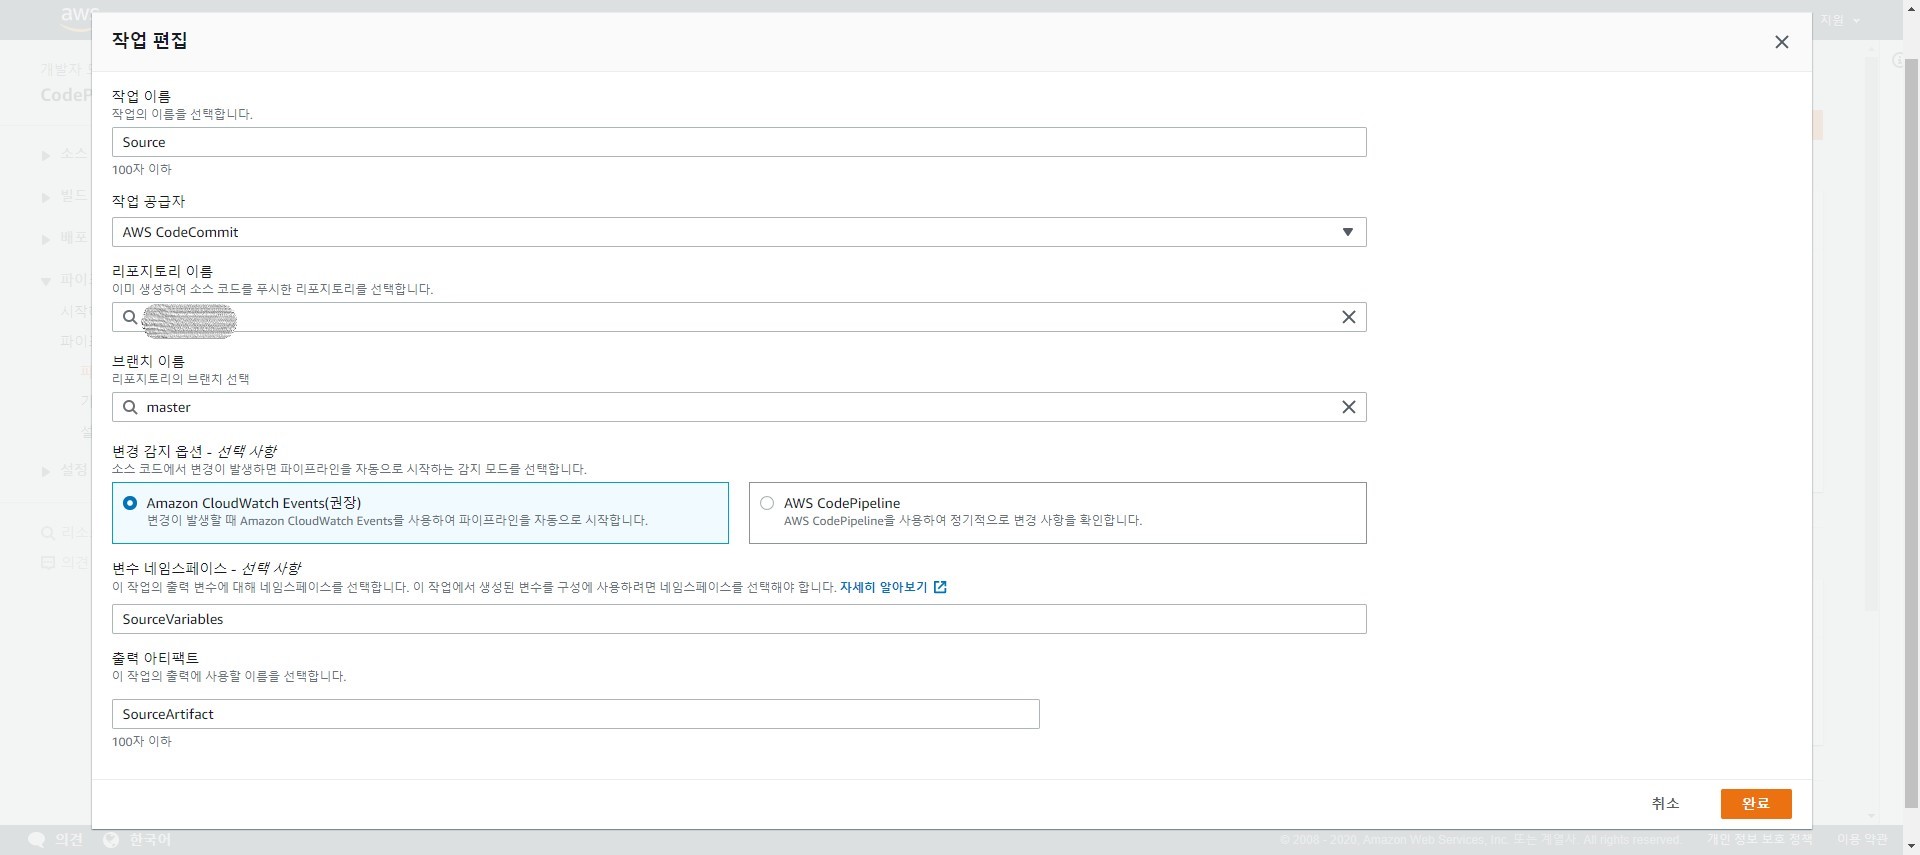
1. Source (Codecommit)
code pipleline 생성 시 commit 단계 설정
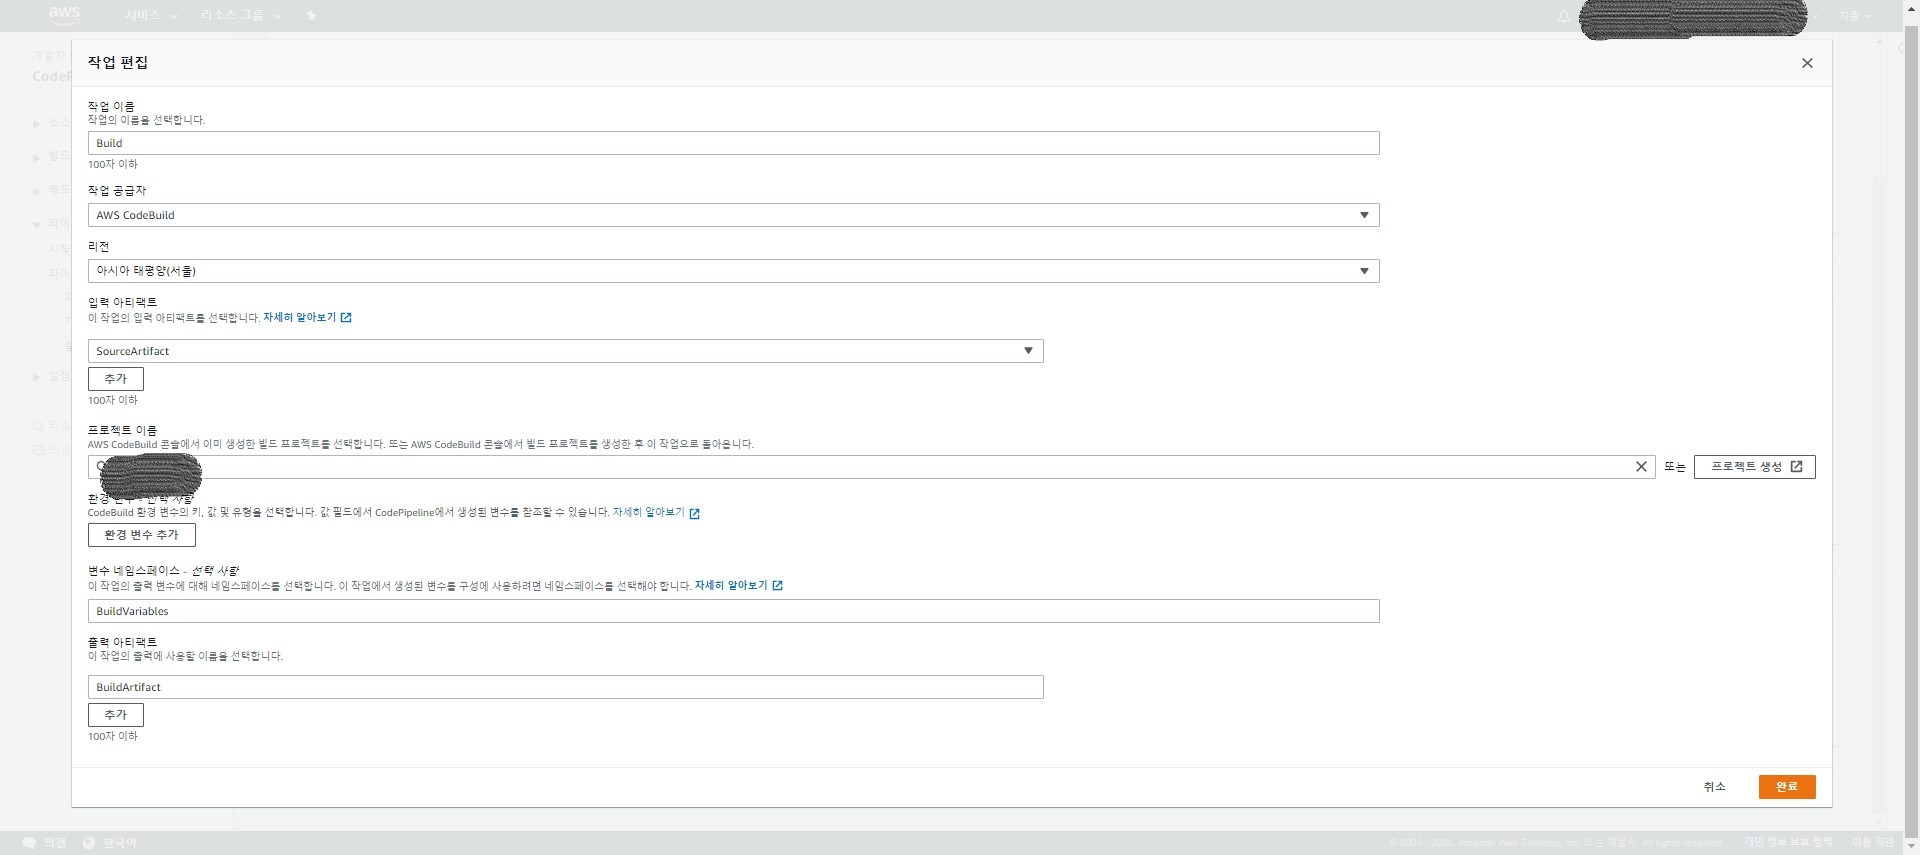
2. Build (Codebuild)
code pipleline 생성 시 build 단계 설정
-
설정
-
빌드명령 (buildspec.yml)
코드 빌드내 빌드 세부명령은 buildspec.yml 파일을 읽어 작동된다. 프론트와 백엔드의 빌드 명령어를 넣어준다.
version: 0.2

phases:
  install:
    runtime-versions:
      java: corretto8
      nodejs: 10
    commands:
      - npm i npm@latest -g # npm 버전 업데이트
  pre_build:
    commands:
      - echo Front Build started on `date`
      - cd frontend/
      - npm install       # 빌드에 필요한 패키지 설치
      - npm run generate  # 실 프론트 빌드
      - echo Front Build completed on `date`
      - cd ..
  build:
    commands:
      - echo Backend Build started on `date`
      - cd backend/
      - mvn clean -DskipTests package
      - cd ..
  post_build:
    commands:
      - echo Backend Build completed on `date`
      - mv backend/target/ROOT.jar ROOT.jar
      -
artifacts:
  name: ROOT
  files:
    - ROOT.jar
    - .ebextensions/**/*
    - Procfile
cache:
  paths:
    - '/root/.m2/**/*'
    - '/root/.npm/**/*'
    - 'build/**/*'
- 해보면 빌드실행시간이 조금 긴데 S3와 연결하여 cache 설정을 해주는 것이 좋다.
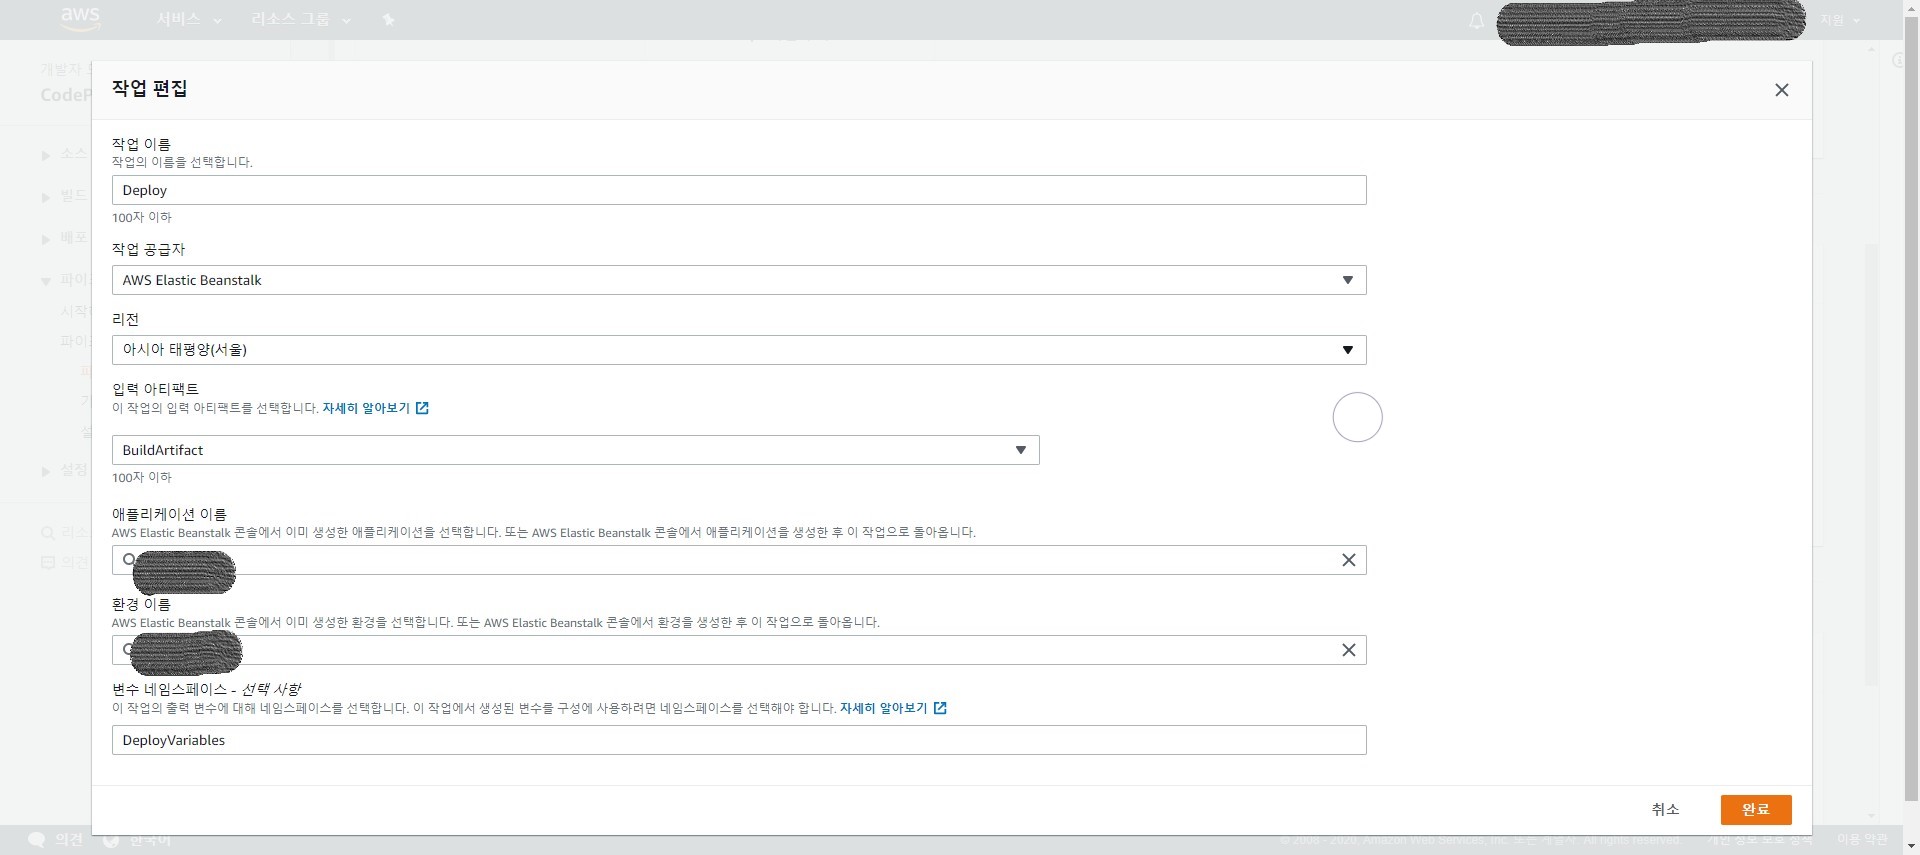
3. Deploy(AWS Elastic beanstalk)
code pipleline 생성 시 deploy 단계 설정
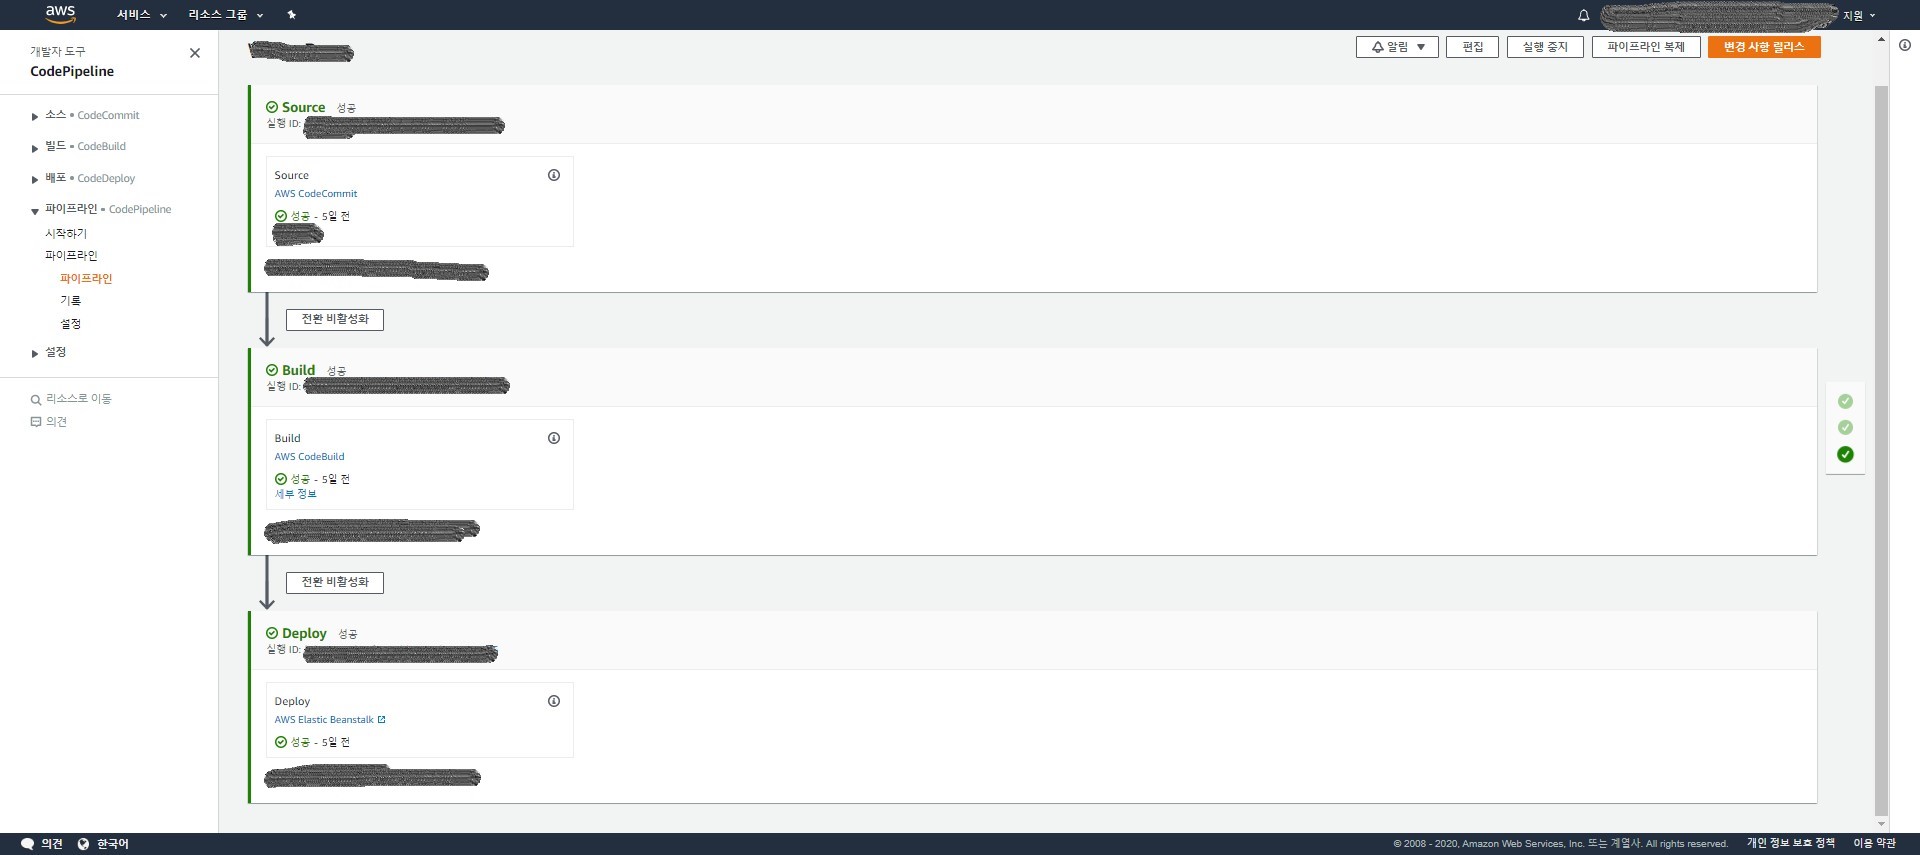
4. 결과 확인
※추가 zip 파일로 아카이빙하기(elastic beanstalk 직접 업로드 용)
참고자료 : https://maven.apache.org/plugins/maven-assembly-plugin/assembly.html
- maven profile로 구분(maven-assembly-plugin 이용, maven pom 파일)
<profiles> <profile> <id>default</id> <activation> <activeByDefault>true</activeByDefault> </activation> </profile> <profile> <!-- AWS Beanstalk 직접 업로드를 위한 로직(zip 파일로 패키징한다.) --> <id>zip-package</id> <activation> <activeByDefault>false</activeByDefault> </activation> <build> <plugins> <plugin> <groupId>org.apache.maven.plugins</groupId> <artifactId>maven-assembly-plugin</artifactId> <configuration> <appendAssemblyId>false</appendAssemblyId> <descriptors> <!-- zip으로 묶기위한 로직 --> <descriptor>assembly-desc-bin.xml</descriptor> </descriptors> </configuration> <executions> <execution> <id>bin</id> <phase>package</phase> <goals> <goal>single</goal> </goals> </execution> </executions> </plugin> </plugins> </build> </profile> </profiles> - assembly-desc-bin.xml
<assembly xmlns="http://maven.apache.org/ASSEMBLY/2.0.0"
  xmlns:xsi="http://www.w3.org/2001/XMLSchema-instance"
  xsi:schemaLocation="http://maven.apache.org/ASSEMBLY/2.0.0 http://maven.apache.org/xsd/assembly-2.0.0.xsd">
  <id>bin</id>
  <formats>
    <format>zip</format>
  </formats>
  <fileSets>
    <fileSet>
      <directory>${project.parent.basedir}</directory>
      <outputDirectory />
      <includes>
        <include>.ebextensions/**</include>
        <include>Procfile</include>
      </includes>
    </fileSet>
    <fileSet>
      <directory>${project.build.directory}</directory>
      <outputDirectory />
      <includes>
        <include>*.jar</include>
      </includes>
      <excludes>
        <exclude>pom.xml</exclude>
      </excludes>
    </fileSet>
  </fileSets>
</assembly>
끝.
Comments